

To understand how a horizontal sundial tells time, we must first understand the path the Sun takes through the sky.
![]()

Does the Sun change its path
through the sky from month
to month?
Are there certain times
during the year when you
know through which part of
the sky the Sun will travel?
These questions are best answered if you have an entire year to make
observations of the Sun to see how its movement through the sky varies.
If you do not have an entire year to observe the Sun, below are some
links that may help you understand the Sun's motion and then
you can spend the next year testing your understanding!
Many people know that the Sun rises in the east and sets in the west, but does it rise EXACTLY east and set EXACTLY west every day?
We also know that the days are longer in the summer and shorter in the winter, but have you ever thought about how the Sun's path through the sky is changing to create these differences?
Let's look at a graphic to help understand the answers to these questions.
![]()
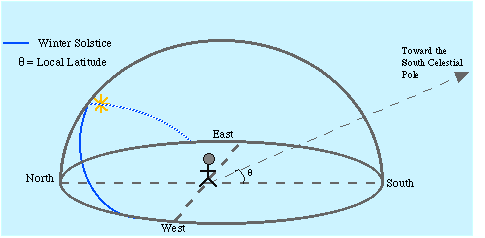
During the short winter days the Sun does not rise exactly in the east, but instead rises just north of east and it sets north of west.
Each day after the winter solstice, which occurs on June 21st, the Sun's path becomes a little higher in the northern sky. The Sun also begins to rise closer to the east and set closer to the west until we reach the day when it rises exactly east and sets exactly west. This day is called the equinox. In the spring we have the Spring Equinox about September 21st. There is also a Fall Equinox on March 21st.
![]()
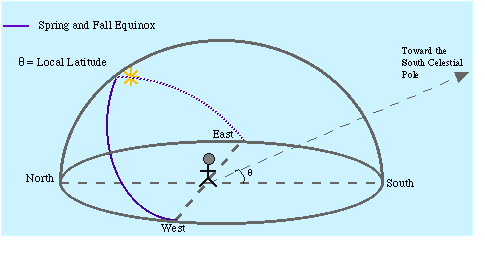
After the Spring Equinox, the Sun still continues to follow a higher and higher path through the sky, with the days growing longer and longer, until it reaches it highest point in the sky on the Summer Solstice.
![]()
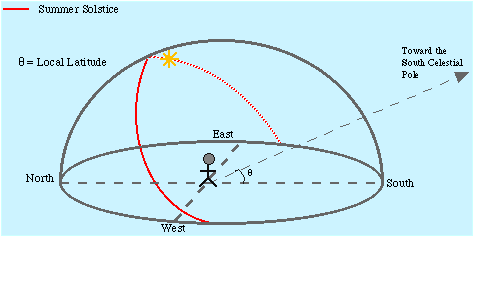
After the summer solstice the Sun follows a lower and lower path through the sky each day until it reaches the point where it is in the sky for exactly 12 hours again. This is the Fall Equinox. Just like the Spring Equinox, the Sun will rise exactly east and set exactly west on this day and everyone in the world will experience a 12 hour day.
After the Fall Equinox the Sun will continue to follow a lower and lower path through the sky and the days will grow shorter and shorter until it reaches its lowest path and then we are back at the Winter Solstice where we started.
In each of the diagrams displaying the path of the Sun for different
times of the year you might have noticed an arrow pointing towards the
South Celestial Pole. We need to understand why the location of the South
Celestial Pole is important in building our sundials. Let's find out!
![]()
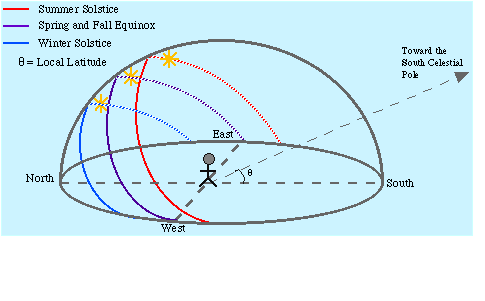
You might wonder why this is important for building sundials. The Sun is also a star, so the Sun also rotates around the South Celestial Pole. It is this rotation that will allow us to use the Sun to tell time.
We need to know where the South Celestial Pole is to use our sundials. How can we find this special place in the southern sky?
No matter where you live in the Southern Hemisphere there is an easy way to find the South Celestial Pole. As you might have guessed it is located due south, but how high in the sky is it? The South Celestial Pole is up in the sky at the same angle as your latitide. So if you live at 50 degrees latitude, the South Celestial Pole will be due south, up 50 degrees.
(An average person has about 10 degrees, from little finger to folded thumb, in a closed fist when held an arm's length away.)
The arrow you see pointing toward the South Celestial Pole in the diagram above is infact the axis about which the Sun, and all other stars rotate. All we need to do to make a well designed horizontal sundial tell time is to point the gnomon of the sundial along this axis. Then, as the Sun rotates around the gnomon it will cast a shadow onto our sundial surface where we will mark the appropriate hourlines. Both the angle of the gnomon and the position of the hourlines depend on the latitude where the sundial will be used.
To use your sundial you will need to be able to find the direction of
due south. A shadowplot is a fun and easy way to find geographic
south.
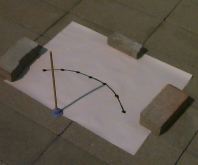
![]()
A shadow plot can also help you obtain a feel for how the Sun's path changes across the sky from day to day. To see this effect it is best to work on the shadow plot for several weeks.
![]()
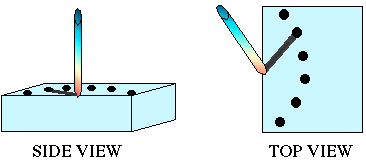
Once you have found a flat location, clear from shadows, push the ball of clay onto the ground. Insert the wooden dowel into the ball of clay so that it stands vertically. The dowel will need to stand in this exact location for the entire day, or for several weeks, so make sure it is secure. You may need to wrap some duct tape around the base of the dowel and further secure it to the ground in this manner or be creative and find a way to secure the dowel so that it remains perfectly vertical.
Once your dowel is in place look for its shadow. If it is morning, the dowel's shadow should be pointing west. Lie your piece of paper down on the south side of the dowel with the middle of the long edge up against the base of the dowel support. (You can figure out which general direction is south since you know the Sun is in the east and the dowel shadow is facing west.)
The image above will help you set up your materials correctly.
Secure the piece of paper with several rocks. Place the rocks, or other
heavy objects, around the edge of the paper so they do not obscure the
middle where you will be making your plot.
You are now ready to start making your measurements.
The shadow from the dowel should be on your piece of paper. If it is not
wait about an hour and return once the shadow is cast onto the paper.
When you have the shadow on the paper, use your permanent marker to make
a mark at the very end of the shadow.
Return to your shadow plot about once every half hour and make a mark at the end of the shadow each time. If you begin your plot at 9:00 a.m. you should have enough markings by 3:00 p.m. When you are finished with one day of measurements you plot should look like the one above.
You are now ready to use this plot to find Geographic South.
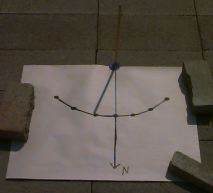
![]()
Once you have drawn a smooth curve through the markings, you want to find the shortest distance between the dowel base and this curve. To do this place a meter stick so that one end is at the dowel base and the curve crosses the meter stick at some other point. Pivot the meter stick about the end at the dowel base until the find the location on the curve that is the shortest distance from the dowel base.
Draw a line from the dowel base to this point as in the image below.
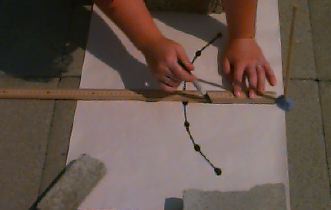
This North-South line points exactly North and South. A line drawn perpendicular to this line will point East and West. You will need to know the exact direction of South to use your horizontal sundial.
![]()
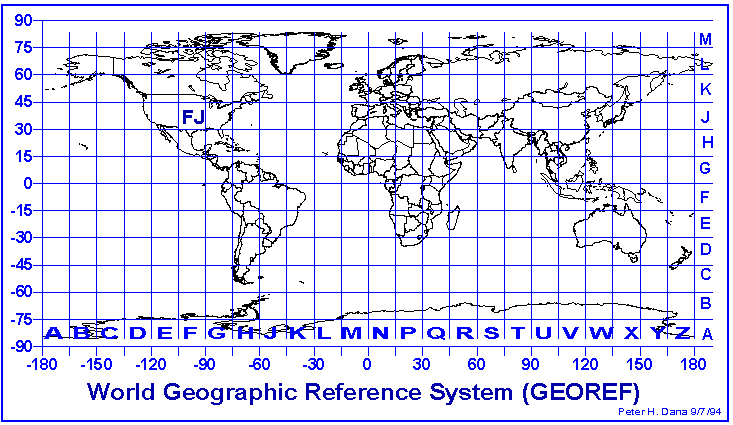
In addition to finding the direction of south you will need to know the latitude of the town or city where you intend to use your sundial in order to build it accurately. If you do not know the latitude of a particular part of the world you can figure it out by looking on a globe or a map that has the latitude lines marked. Latitude is measured in degrees from the equator. The equator is zero degrees latitude, the north and south poles are ninety degrees latitude. Here is a latitude grid of the world.
![]()
 The complete construction of a sundial involves the use
of a protractor and
the understanding of some trigonometric functions like sine and tangent.
The different levels below allow you to construct a sundial no matter what experience you have with these mathematical tools. Select the level appropriate for your understanding from the choices below and we'll get to work!
![]()
ADVANCED
If you are comfortable using a protractor and are familiar with the trig
functions sine and tangent this is the level for you!
INTERMEDIATE
If you are comfortable using a protractor to measure angles, but are not
familiar with the trig functions sine and tangent select this level.
NOVICE
If you are not comfortable using a protractor and are not familiar with
the trig functions sine and tangent start at this level.
![]()
![]()
Lesson designed by the YPOP Team
For questions about this lesson, please contact
Michelle B. Larson